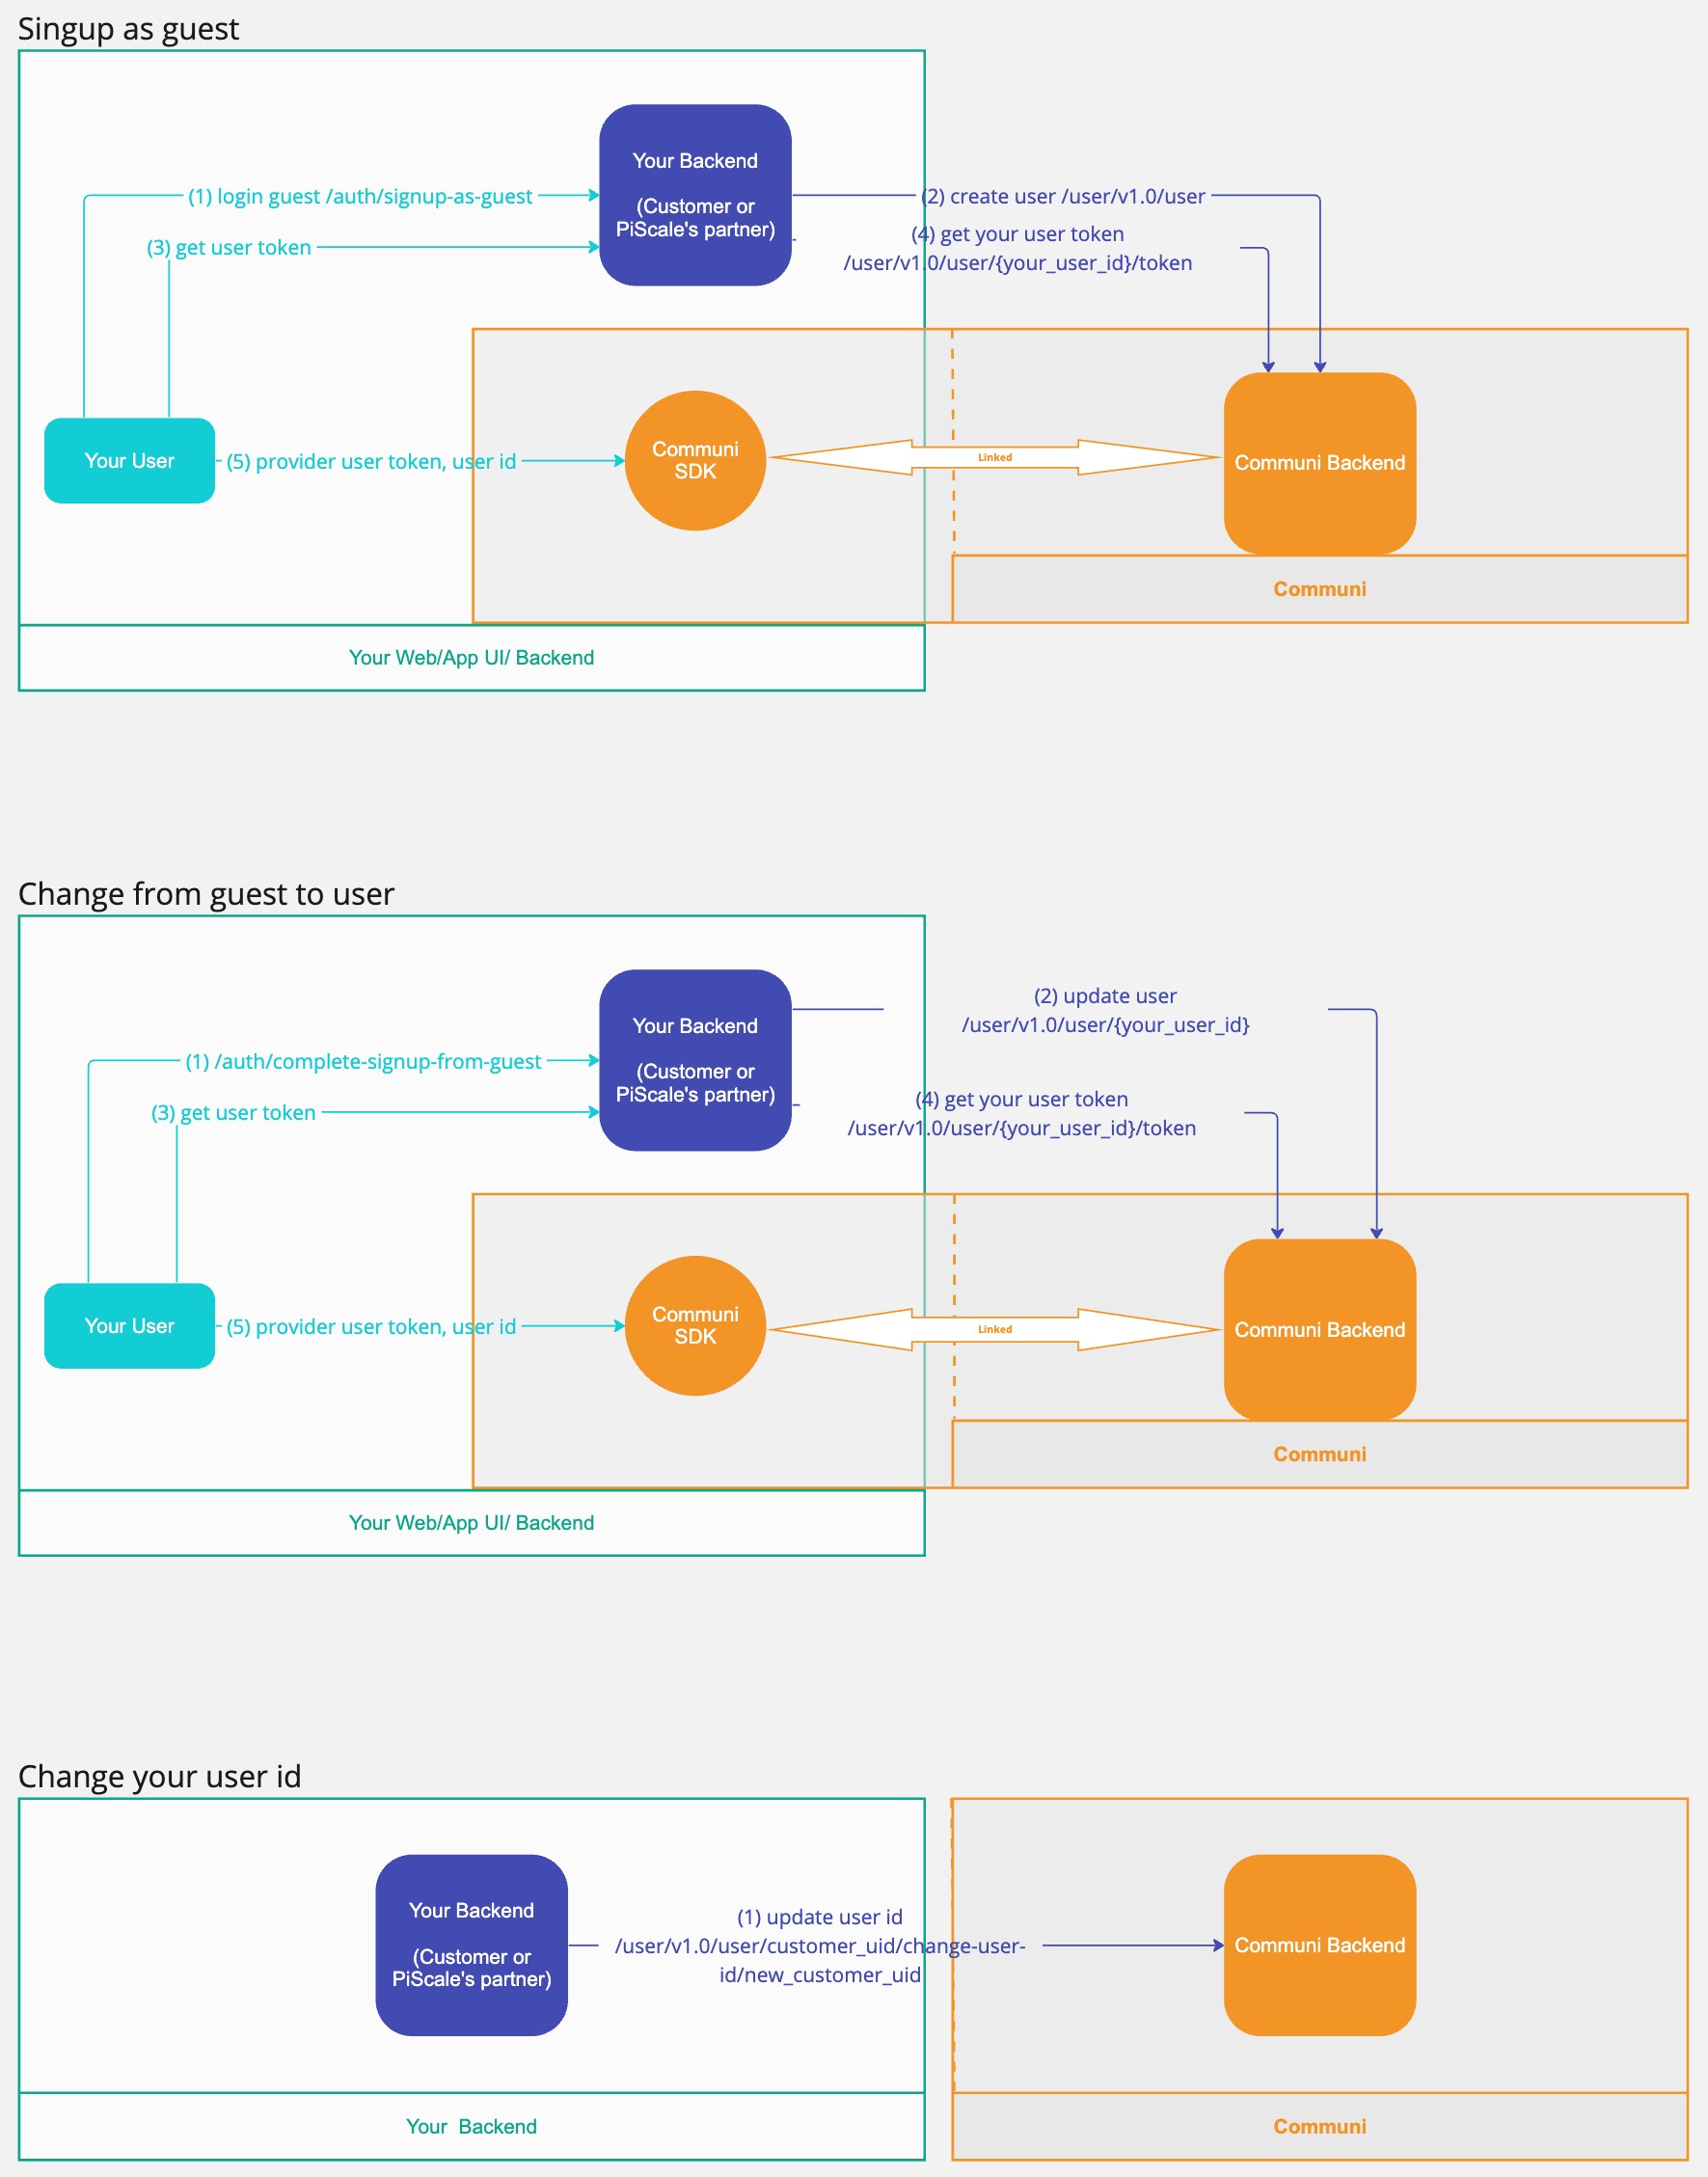
Người dùng khách
Để hỗ trợ được tính năng này backend api của bạn bạn cần thực hiện tích hợp các bước:
Best practices

Đề xuất:
Step 1: tạo 1 api mới xử lý cho người dùng khách (guest user)
Ví dụ: bạn đã có api tạo mới 1 user như sau:
curl -X 'POST' \
  'https://api.yourdomain.org/user/v1.0/auth/signup' \
  -H 'accept: application/json' \
  -H 'Content-Type: application/json' \
  -d '{
  "email": "[email protected]",
  "full_name": "your name",
  "password": "your password" // bạn nên dùng hash + salt cho password này
}'
Khi đã tạo được user bạn trả về kết quả như sau:
{
  "data": {
    "access_token": "string",
    "profile": {
      "email": "[email protected]",
      "full_name": "your name",
      "id": 696969,
    }
  }
}
Bạn nên tạo ra api /signup-as-guest như sau (nên là không yêu cầu user nhập thêm bất cứ gì):
curl -X 'POST' \
  'https://api.yourdomain.org/user/v1.0/auth/signup-as-guest' \
  -H 'accept: application/json' \
  -H 'Content-Type: application/json'
Khi server api của bạn nhận được yêu cầu này hãy random các thông tin được yêu cầu ở api /signup và chuyển tiếp yêu cầu này tới api /signup của bạn kết quả trả về của api /signup-as-guest sẽ giống với api /signup:
{
  "data": {
    "access_token": "string",
    "profile": {
      "email": "[email protected]",
      "full_name": "your name",
      "id": 696969,
    }
  }
}
Ví dụ code triển khai cho api này bằng Typescript chạy bằng nodejs
import express from 'express';
import cors from 'cors';
import rateLimit from 'express-rate-limit';
import helmet from 'helmet';
import { v4 as uuidv4 } from 'uuid';

const app = express();

// Enable CORS
app.use(cors());

// Rate limiting
const limiter = rateLimit({
  windowMs: 15 * 60 * 1000, // 15 minutes
  max: 10 // giới hạn tạo tối đa 10 tài khoản guest của 1 ip trong 15 phút
});
app.use(limiter);

// Set security headers
app.use(helmet());

// Enable JSON use
app.use(express.json());

app.post('/user/v1.0/auth/signup-as-guest', (req, res) => {
  // Here you would normally call your /signup API with the generated data
  // For the sake of the example, we're just generating the data here
  const data = {
    access_token: uuidv4(),
    profile: {
      email: `${uuidv4()}@yourdomain.org`,
      full_name: 'your name',
      id: Math.floor(Math.random() * 1000000),
    }
  };

  // tạo mới thông tin của guest user và đồng bộ tới hệ thống của Communi
  // ...

  res.json({ data });
});

// Start the server
app.listen(3000, () => {
  console.log('Server is running on port 3000');
});
Chú ý: phần code tạo mới thông tin của guest user tới hệ thống của Communi bạn xem lại hướng dẫn tại đây
Step 2: Security checklist dành cho api /signup-as-guest của bạn:
- HTTPS
- Đường dẫn giống vs api tạo mới 1 người dùng của bạn
- Rate limit (must have)
- CORS & CSRF
- Logging và Monitoring
- reCAPTCHA
Step 3: để chuyển đổi user khách (guest user) thành user thông thường bạn hãy tạo mới api /auth/complete-signup-from-guest
curl -X 'POST' \
  'https://api.yourdomain.org/user/v1.0/auth/complete-signup-from-guest/{guest_user_id}' \
  -H 'accept: application/json' \
  -H 'Content-Type: application/json' \
  -d '{
  "email": "[email protected]",
  "full_name": "your name",
  "password": "your password" // bạn nên dùng hash + salt cho password này
}'
Ví dụ code triển khai cho api này bằng Typescript chạy bằng nodejs
app.post('/user/v1.0/auth/complete-signup-from-guest/:guest_user_id', async (req, res) => {
  const { email, full_name, password } = req.body;
  const { guest_user_id } = req.params;

  const hashedPassword = await bcrypt.hash(password, 10);
  const data = {
    guest_user_id,
    email,
    full_name,
    password: hashedPassword,
  };

  // lưu lại thông tin thay đổi này vào database của bạn
  // ...

  // đồng bộ thông tin của user này tới hệ thống của Communi
  // ...

  res.json({ data });
});
Chú ý: phần code đồng bộ thông tin của user tới hệ thống của Communi bạn xem lại hướng dẫn tại đây
Body của api này nên giống với api tạo user của bạn và khi server api của bạn nhận được yêu cầu này hãy update thông tin của user theo {guest_user_id} và đồng bộ lại thông tin của user qua backend của Communi giống với khi bạn tạo 1 user mới.
Step 4: Thay đổi user id
Nếu backend của bạn quản lý user khách và user thông thường với 2 loại user_id khác nhau và bạn vẫn muốn giữ lại lịch sử chat của user hãy dùng api sau để thay đổi user_id trên hệ thống của Communi.
PATCH https://{app_id}.api.piscale.com/user/v1.0/user/{user_id hiện tại}/change-user-id/{user_id mới}
Request header
Bảng mô tả tham số của request header:
| Tên | Kiểu dữ liệu | Mô tả | Bắt buộc |
|---|---|---|---|
| X-Api-Key | string | API Key của ứng dụng | ✓ |
| X-Tenant-Id | string | Chỉ định tạo user cho tenant nào (ID bên hệ thống của bạn) | ✗ |
Request body (Bỏ trống)
Responses
Nếu thành công, API này trả về dữ liệu như sau:
{
  "message_code": "M200",
  "message": "Success"
}
| Tên | Kiểu dữ liệu | Mô tả |
|---|---|---|
| message_code | string | Mã thông điệp. Xem chi tiết |
| message | string | Nội dung mã thông điệp |
Ví dụ code triển khải gọi tới server api của Communi thay đổi user id
const fetch = require('node-fetch');

const app_id = 'your_app_id';
const current_user_id = 'your_current_user_id';
const new_user_id = 'your_new_user_id';
const api_key = 'your_api_key';

const url = `https://${app_id}.api.piscale.com/user/v1.0/user/${current_user_id}/change-user-id/${new_user_id}`;

const options = {
  method: 'PATCH',
  headers: {
    'X-Api-Key': api_key
  }
};

fetch(url, options)
  .then(res => res.json())
  .then(json => console.log(json))
  .catch(err => console.error('error:' + err));